A broken router is no fun! After all, everything on your network depends on it – streaming, gaming, schoolwork, and real work all get impacted equally when your router stops working. Here are some steps to take (ordered from simple to advanced) to determine if your router is bad.

Start Simple:
Why do you think your router is the problem? Just because you can’t access the internet? The first, and often overlooked step, is to isolate the issue. Are all of the devices in your house affected, or just your computer? If only your computer is affected, the problem is likely not the router.
It is best to figure this out before spending time troubleshooting the wrong issue. If the problem is affecting your entire house, perhaps it is the router and you should continue troubleshooting.
Look at your router and start by checking the obvious things. Is it still plugged into the power outlet and is the outlet supplying power?
If the outlet is wired to a light switch, check to make sure that the switch is in the ‘on’ position. The same goes if the router is connected to a power strip or surge protector – make sure the power switch is on there too.
Also, check your breaker panel and verify that the breaker for that outlet hasn’t tripped.
Now check the indicator lights on the router? Do they look normal? Most routers’ lights will flash to indicate activity on the network – are they flashing?
Are the status lights for the ethernet ports on your router lit up? You should see a ‘link’ light when a device such as a laptop or printer is plugged in to a specific port only. You shouldn’t, however, see port ‘link’ lights on ports that are not plugged in. Seeing a ‘link’ light on all ports, regardless of whether or not they are plugged in, is a classic sign that the router is having issues.
Is the router generating heat? Does it seem like a normal amount?
What about noise? Generally, consumer routers don’t make any noticable noise.
These types of observations may assist you in determining the health of your router.
Intermediate Troubleshooting: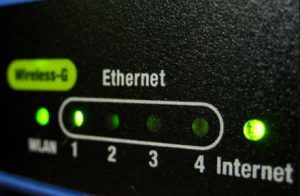
Is your router functioning (passing traffic)? Try opening up a command window and seeing if your computer currently has an IP address. This can be done by running the ‘ipconfig’ command on Windows, or the ‘ifconfig’ command on Mac and Linux.
Most networks are configured to provide IP addresses from the router, so if your computer has a valid IP address, your router might be functioning okay. Now that you have your IP address, try pinging it (ping yourself). This should always be successful – if it’s not, it could indicate that your computer’s networking components aren’t functioning correctly and, again, is not the router’s fault.
Now, try pinging the IP address of your router (this is the gateway address listed in the ‘ipconfig’ or ‘ifconfig’ commands you ran earlier). See this article for more help with finding your router’s IP address.
If that is successful, try pinging another device on your network. If that works, your router seems to be passing traffic okay. Maybe the problem is isolated to your internet service?
Try pinging Google’s primary DNS server, 8.8.8.8. If that is successful, try pinging google.com. If you can ping 8.8.8.8 but not google.com, you are experiencing a DNS issue – but if you can also ping google.com, your internet should be functioning normally.
If your router seems to be okay but your internet service isn’t working, try rebooting your DSL/Cable modem or contact your ISP for assistance.

Ruling out the router for good:
If you still haven’t tracked down the problem, here is a good way to test your router: bypass it and connect your computer directly to your ISP’s device (typically a DSL modem, cable modem, or fiber ONT).
To do this, unplug the cable connecting to the WAN or Internet port on your router and connect it to your computer. Can you access the internet now?
If so, your router is almost certainly the issue since bypassing it got you back online.
Keep in mind that this test method will only work for some people – it depends on how your ISP configures your service. If your ISP uses static IP addressing or PPPoE, you would need to take additional steps to use this test method – simply plugging in directly will not work.
Advanced Troubleshooting:

If at this point you’ve established that the router is bad, you can either cut your losses and replace it, or you can attempt some advanced procedures that might possibly allow you to recover your router.
If you decide to continue troubleshooting the router, the next step would be to attempt to reset the router to defaults. This will wipe the current config from the router and reboot it into the factory-default state that it was in when you first opened the package.
The process for this operation differs from router to router, but typically involves pressing and holding the ‘reset’ button on the router down for up to 40 seconds. Sometimes, you have to power cycle the router while you are holding the reset button down – be sure to check your router’s documentation.
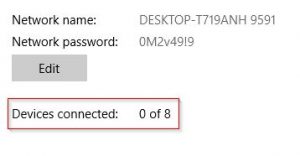
Be advised that if this procedure is successful, you will need to re-configure your router from scratch: set up your wireless network name, password, channel setting (if previously configured), administrator password, port forwarding (if applicable), etc.
Console Cable
Some routers have a special port (called a console port) that can be accessed with a cable like this. In many cases, the router casing has to be opened in order to access the console port, so this is not for the faint of heart.
Using the console port allows you to access the routers’ pre-boot/loading environment, which can sometimes be used to fix a router that won’t boot.
Since every router is different, I recommend doing some research to see if your router brand/model is equipped with a console port and what recovery techniques can be accomplished using it before you purchase a cable.
Flash It:
If a factory reset doesn’t work, the next step would be to attempt reloading the router’s firmware, aka ‘flashing’ it.
The concept of reloading firmware is usually used to replace a bricked router that has been broken due to being tinkered with. If your router failed in service (you weren’t doing anything to it when it failed), this probably won’t work, because the router is probably broken at the hardware level, not the software level. Still, you may want to continue – what do you have to lose?
The process for reloading the firmware differs from model to model and brand to brand – the procedures are too different and vast to name them all here. I’d suggest searching for something like “reload firmware brand_name model_number router” into your favorite search engine.
This should help you find specific instructions to follow. Keep in mind that attempting to “flash” your router’s firmware can cause your router to completely stop working – again, you might not have anything to lose, but I wanted to give that disclaimer none the less.
The basic jist of reloading the firmware involves uploading a new firmware file from your computer to the router. This can either be done via TFTP, or serially by connecting a special cable to the router. In some cases, you have to partially disassemble the router in order to get to the serial port.
Again, check your router’s documentation for this process, or online. Once the new fimware file has been uploaded, reboot the router and hope that it comes back to life!
Need a new router now?
Our current pick for the best router (for most people) is the ASUS RT-AC68U. This router provides fast, stable performance, is loaded with features, and is available at a reasonable price.
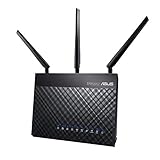
- Dual band with the latest 802; 11 AC 3x3 technology for combined speeds of up to 1900 Mbps.AiProtection : AiProtection Pro, AiProtection, Malicious site blocking, Two-Way IPS, Infected Device Prevention and Blocking. WAN : Internet connection Type - PPPoE, PPTP, L2TP, Automatic IP, Static IP. Dual WAN, 3G/4G LTE dongle, Android tethering, Port forwarding, Maximum port forwarding rule : 64, Port triggeringc, Maximum port triggering rule : 32, DMZ, DDNS, NAT Passthrough : PPTP, L2TP, IPSec, RTSP, H.323, SIP Passthrough,PPPoE relay.
- 1 GigaHertz dual core CPU enables smart multitasking by dedicating separate lanes for Wi Fi and USB data; Network standard: IEEE 802; 11a, IEEE 802; 11B, IEEE 802; 11G, IEEE 802; 11N, IEEE 802; 11AC, IPv4, IPv6. Memory: 128 MB Flash; 256 MB RAM
- Effortless router setup with the ASUSWRT web based interface; Dual band connectivity for compatibility and performance
- Monitor and manage your network with ease from your mobile device using the intuitive ASUS router app
- A protection powered by Trend Micro provides multi stage protection from vulnerability detection to protecting sensitive data; Please refer the installation manual and the user manual before use which is highly essential; Dc output: 19 Volt with maximum 1; 75 a current; Guest network: 2; 4 GigaHertz x 3, 5 GigaHertz x 3

Andrew Namder is an experienced Network Engineer with 20+ years of experience in IT. He loves technology in general, but is truly passionate about computer networking and sharing his knowledge with others. He is a Cisco Certified Network Professional (CCNP) and is working towards achieving the coveted CCIE certification. He can be reached at andrew@infravio.com.


 Additional security settings


 HughesNet’s current service tier, dubbed ‘Gen5’ and served by their epic new “EchoStar XIX Satellite”, boasts speeds up to 25Mbps down and 3Mbps up. While impressive compared to their previous offerings, Gen5 service just barely meets (not exceeds!) the


